|
All content
copyright © 1995-2002
RedShirtImaging, LLC.
Website Design by
Elizabeth Nephew
|
 WARNING WARNING- While most of the MacroScope parts are robust, two
connections are made with "instant" or "crazy" glue and are relatively
weak. These are the connection of the lens to the metal block just
above it and the connection of the dichroic mirror to its metal
support. Care in handling is in order. In case of accidents, repairs
can be made with instant glue for the lens and
5-minute epoxy for the dichroic mirror.
- Illumination
- To provide even illumination of a large field use a lamp
with a large filament. This is especially important for the 2X lens. A
24 volt, 300 watt, tungsten-filament lamp has a relatively large
filament.
-
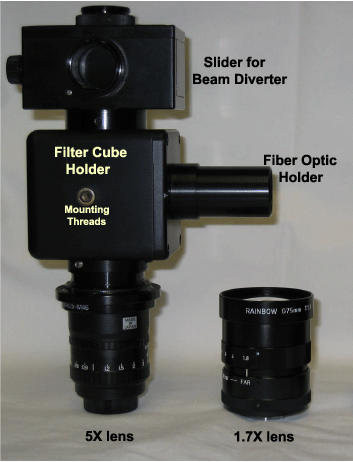
- Mounting
- While the photograph of the MacroScope
on the web site shows the
MacroScope to be free standing (separate from a camera), we find it
more convenient to attach the MacroScope directly to the camera via the
vertical C-mount. This fixes the alignment and the distance between the
lens and camera. RedShirtImaging provides mounting hardware for
NeuroPDA or NeuroCCD cameras with the MacroScope.
- Optical Alignment
- The MacroScope is designed to form a
real inverted image 1.7 cm above (past) the end of either C-mount. For
both the 2X and the 4X objectives a working distance of about 1.2 cm
should form an image at the correct location.
-
- When shipped, the dichroic mirror was
aligned so that it illuminated the preparation evenly and it was
centered. You should check this alignment. First, aim the light source
so that it is perpendicular to the imaging path and
focus an image of the filament or arc at the back of the lens (Kohler
illumination). Take a piece of graph paper and position
it just below the lens with your Z-axis positioner and draw
an outline of the bottom of the lens. Then mark the center
of the circle with a black spot. Lower the graph paper by 1.2
cm. A centered image should be formed 1.7 cm past the end of
the C-mount. In addition, the illumination should be correctly
centered on the graph paper and should be reasonably even.
You can adjust the centering using the three thumb screws on the back
of the dichroic mirror holder and by rotating the dichroic holder
(after loosening the two set screws).
-
- When shipped, the beam diverter for
the auxiliary C-mount was aligned so that it projected a centered image
onto an auxiliary CCD camera. You will probably need to adjust this
alignment with the three thumb screws on the back of the diverter.
- Changing Lenses
- The Linos parts fit together rather
tightly. In order to change lenses you will probably need to loosen all
12 set screws that are used to attach the lens holder, the mounting
plate, and the cube to the four stainless steel bars that are used to
connect the three parts.
- Additional Parts
- Many of the parts in the MacroScope
are obtained from Linos Photonics, Inc., Milford, MA 01757 USA. If you
wish to make modifications to the MacroScope, we are happy to give
advice or you can consult their catalogue. We can provide a parts list.
|
