|
- Connect cables for the system
following the instructions on the Schematic Diagram for the NeuroCCD
shown below.
- Attach the IDL dongle onto
the printer port.
 Schematic
Diagram of the NeuroCCD System Schematic
Diagram of the NeuroCCD System
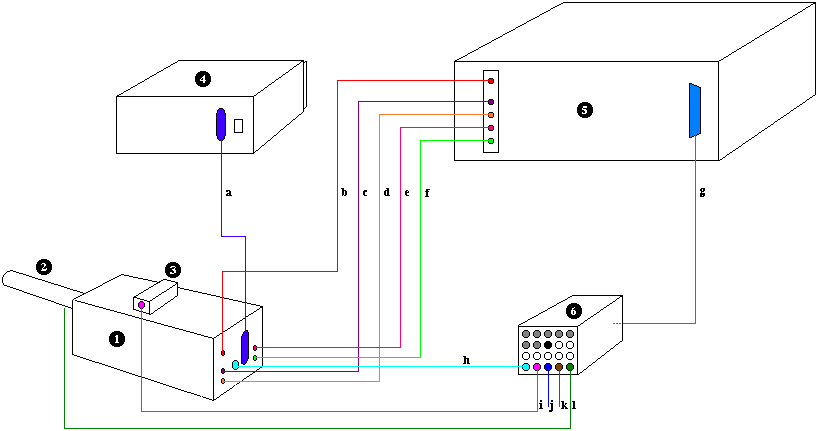
Units
|

|

|
FastOne Camera
|
|
|
|
FastOne is a high-speed
back-illuminated CCD camera which acquires continuous frames at a speed
up to 2.7 Kfps.
|
|
|
|
|
|

|
|
Optical Coupler
|
|
|
|
Resizes the image created on the
microscope image plane onto the 1.44 mm2 CCD chip at a ratio
of 10:1. C-mounts are used for standard microscope mounting.
|
|
|
|
|
|

|
|
Fan Controller
|
|
|
|
The fan controller is an electrical
on/off switch that turns off the fan in response to a binary pulse sent
out by the computer during the data acquisition. It is important, in
most cases, to turn the fan off because the fan introduces vibration
noise which becomes prominent in the image field where there is spatial
contrast.
|
|
|
|
|
|

|
|
Power Supply
|
|
|
|
Power supply for the camera.
|
|
|
|
|
|

|
|
Computer
|
|
|
|
The data acquisition unit with: 1. a
PCI card that connects to the A-to-D inside the camera and 2. a second
A-to-D/D-to-A board that records up to 7 channels of electrical data
and controls the experiment.
|
|
|
|
|
|

|
|
Control Panel
|
|
|
|
The control panel is the switch board
for various signals.
(1). It
receives the trigger signal from the camera via line h.
(2). It sends out the control signals from the D-to-A to control the
fan (line i), the shutter (line j), the stimulator (line k) and the
synchronizing LED (line l).
(3). It receives electrical signals via the top 7 channels ( ). The 8th channel (
 ) is currently used for synchronizing signals that synchronize the
optical data and the electrical data. Do not use this channel.
) is currently used for synchronizing signals that synchronize the
optical data and the electrical data. Do not use this channel.
|
Connections:
a. Connects the power supply to
the camera.
b. Control line between the
camera and its PCI board. (b-f are fiber optic cables)
c. Connection between the camera
and the PCI board -- Channel 0.
d. Connection between the camera
and the PCI board -- Channel 1.
e. Connection between the camera
and the PCI board -- Channel 2.
f. Connection between the camera
and the PCI board -- Channel 3.
g. Connects the 2nd
A-to-D to the control panel. The BNC connectors on the front face of
the control panel are connected to the inputs and the outputs of the
A-to-D.
h. A trigger line from the
camera to the control panel. This triggers the electrical data
acquisition and the experimental control of the 2nd A-to-D.
The connector on the camera is labeled as "Shutter Sync".
i. Fan control line that turns
the camera fan off before the data acquisition to eliminate the
vibrational noise caused by the fan.
j. Shutter control that
opens the shutter during data acquisition.
k. Trigger pulse for a
stimulator.
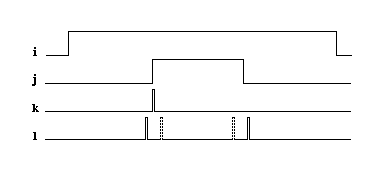
l. This output provides
synchronization signals to the LED and BNC8 (BNC8 is connected
internally). Because the first triggering pulse from the camera does
not correspond to the first frame acquired, it is important to have
this synchronization signal. The pulses marked by a dashed line in the
diagram below will appear on the 8th electrical trace and in
the optical data when the user elect to include the synchronization
test.
Diagram
of Output Signals from i-l
|