|
|
All
content |
The
coupler has C-mount connections on each end. The end with the small
diameter lens is screwed into the FastOne
camera. The other end is screwed to a C-mount port on the microscope.
The coupler has two adjustments, one for focus and
the second for centering. Focus Adjustment The
focus adjustment can be used to make the camera and the microscope
eyepieces parfocal. 1.
Focus on an
object using the eyepieces. 2.
Loosen the
connection between the coupler and the camera. 3.
Loosen the two
Allen screws on the part of the coupler closest to the camera. 4.
Using the
Acquire Continuously function in NeuroPlex,
rotate the part of the coupler closest to the camera until the focus is
sharpest. (Items 1-8 of Start-Up Procedure) 5.
Tighten the two
Allen screws and the connection to the camera. Centering Adjustment The
centering adjustment can be used to make the camera and the microscope
eyepieces have the same center. 1.
Center an
object using the eyepieces. 2.
Loosen the
three Allen screws on the part of the coupler distal to the focus
adjustment. 3.
Using the
Acquire Continuously function, adjust the three Allen screws so that
the object is centered. Then tighten the screws.
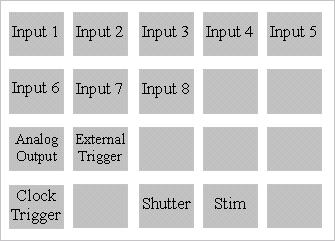
This
unit is the external connection to the A-to-D board (DAP820/DAP840) and
thus has the capacity of sending out TTL and other analog signals as
well as accepting incoming signals. Inputs 1-8 : These
8 BNCs are intended for input of electrical data (Voltage, Current etc..) to be recorded in synchrony with the optical
data. Connect the output from your amplifier(s) to any of those inputs.
The inputs are digitized at 12 bit accuracy. Clock Trigger: Connect
"Shutter Sync" on the camera to this BNC. This way - the camera
triggers the electrical data acquisition by the AtoD
board. (see diagram in NeuroCCD Installation). Shutter: Connect
this BNC to the "Pulse Input" BNC on your Shutter Control Box and set
the later to "remote control" (Names relate to the Uniblitz
shutter control and might vary). The data acquisition module of NeuroPlex controls the shutter via this output. Stim: Connect
this BNC to the "External trigger" of your stimulator. Any delay
desired between the start of recording and the stimulus should then be
set on your stimulator. The following
functions are available for systems that have a DAP840 (but not DAP820)
A-to-D cards (1)
(2) Analog Output: Any
signal sent by the NeuroPlex data
acquisition function "Analog Output", will be output through this BNC.
Thus - in order to send a voltage command or a waveform - this BNC
should be connected to the appropriate external input on your amplifier. (1) To determine the type of DAP card you have see: NeuroCCD Hardware (2) If your system was shipped prior to October 2001 you might have to make the connections inside the box for these 2 functions. See: NeuroCCD-sm Hardware
|
||||||||||||||||||||||||||||||||||||||||||||||||||||||||||||||||||||||||||||||||||||||||||||||||||||||||||||||||||||||||||||||||||||||||||||||||||||||||||||||||||||||||||||||||||||||||||||||||||||||||||||||||||||||||||||||||||||||||||||||||||||||||||||||||||||||||||||||||||||||||||